South Downs Photography. Sussex Freelance Landscape Photographer.

Where to focus in landscape photography

Knowing where to focus in landscape photography is important, and it seems to be an issue that many beginning, or even intermediate, photographers struggle with. We usually want everything in our scene to appear sharp, and depth of field is a finite resource, which needs to used skillfully.

I’ll try to explain my approach to focusing in this short piece. Like everything else pertaining to landscape photography, I believe it is simple. But we do need to understand the basic “mechanics” of focusing to use it efficiently.

A bit of focusing theory

If you’re new to photography, it will behoove you to familiarise yourself with a few essential concepts. Specifically: focusing distance, plane of focus, depth of field, and hyperfocal distance. If you already know and understand these terms, you can probably skip this part.

FOCUSING DISTANCE

When you adjust your focus, manually or using AF (auto-focus), you always set it at a specific distance. Even if you have more than one AF point activated and several of them light up to indicate the areas “in focus”. Or if you have just one active AF point, and you may be thinking that you’ve set your focus on one exact object, you are still focusing at a specific distance.

PLANE OF FOCUS

Any point in your frame that is located exactly at this distance from the camera will be in perfect focus. (At least theoretically, as lenses have all kinds of imperfections and often aren’t equally sharp across the whole frame.) Any points at the focusing distance from the camera are all located on a plane, which is perfectly parallel to the lens. This is the “plane of focus” or “focal plane”. Anything behind or in front of this imaginary plane will be technically out of focus.

So let’s say you want to photograph a mural on a flat wall 10 metres away from the camera. If you adjust the camera on the tripod so it’s perfectly parallel to the wall, and set your focus at exactly 10 metres, the wall surface will coincide perfectly with the plane of focus. Thus the whole mural will be in perfect focus. But a person leaning against the wall will be out of focus. Because she’ll be in front of the focal plane, closer to the camera.

DEPTH OF FIELD

A plane is a mathematical construct that is flat, two-dimensional – it has no depth. In other words, it’s infinitesimally shallow. However, in practice what we perceive as sharp in a photograph extends beyond the true plane in both directions. That is from the focal plane towards the camera, as well as away from it. And this “buffer zone” of acceptable sharpness is called Depth of Field (DoF).

Sussex Landscape Photography. South Downs Freelance Photographer.

Spring afternoon in South Downs National Park.

  • Focal length: 137mm
  • Aperture f/8
  • Shutter speed 1/30s
  • tripod

I wasn’t able to fit everything within DoF in this situation, due to the focal length and the short distance from the nearest areas. So I sacrificed the bottom – the closest fence posts and bushes on the right are out of focus. I focused on the tree in the middle to make sure that the centre and top half of the frame were sharp, since they were more important to me in this instance than the bottom fringes.

DoF is determined by three factors:

  1. Aperture – the smaller the aperture size (i.e. the higher the aperture number), the larger the depth of field. Thus you’ll get a lot more depth at f/11 than at f/2.8, while using the same focal length and focusing at the same distance.
  2. Focusing distance – the farther away you focus, the more depth of field you get. (When you focus at something 3cm away with a macro lens, DoF will be extremely shallow, probably less than a millimetre. If you focus the same lens on the same aperture setting at 100m away, you’ll probably get tens, in not hundreds, of metres worth of DoF.)
    As the focusing distance increases, the depth grows at a faster rate beyond the plane of focus than towards the camera.
  3. Focal length – the longer it is (and so the more magnification it produces), the shallower the DoF. As an illustration, a 24mm lens will have a lot more depth of field than a 200mm lens when both are at the same aperture setting and focused at the same distance.

Where to focus in landscape photography. Slawek Staszczuk Photography.

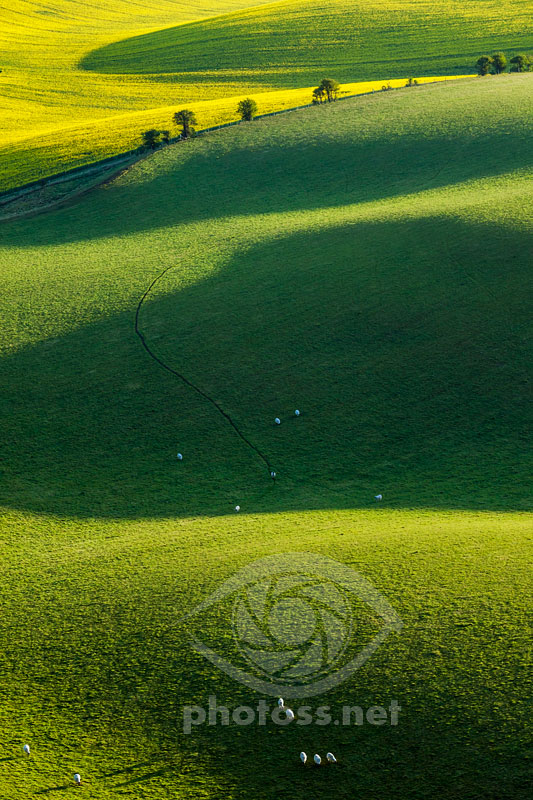
Spring morning in South Downs National Park.

  • Focal length: 164mm
  • Aperture f/8
  • Shutter speed 1/30s
  • tripod

Although telephoto lenses have inherently shallow DoF, the distance made up for it. Even the closest areas in the frame were a couple hundred metres away from the camera, and I could easily include everything within the depth of field.

HYPERFOCAL DISTANCE

In most cases, when taking landscape photographs, we want to achieve maximum depth of field, so as to make everything within the frame appear sharp. You can increase DoF by stopping down the aperture, or by choosing a wider angle lens (shorter focal length). But you can also make better use of this resource by choosing your focusing distance more efficiently.

Hyperfocal distance is the closest distance you can focus at that will allow you to include everything from the plane of focus to infinity within the depth of field. Because DoF goes also from the focal plane towards the camera, focusing at hyperfocal distance should give you the greatest achievable depth in any situation.

If you focus on infinity, objects close to the camera will often come out blurred. Conversely, if you focus on the closest objects, the farther areas in the frame may be rendered out of focus. In both cases you’re not making full use of the potentially available DoF.

Of course, you will run into situations where you’ll have objects both very close to the lens, and at “infinity” in the same frame. And even focusing at hyperfocal will not create enough depth of field to cover the whole range. In these instances you’ll need to either make some sacrifices, or possibly resort to focus stacking (a subject beyond the scope of this short article, and a technique I never use).

Putting it into practice

There are charts, and now also mobile apps, and possibly some other aids meant to help you calculate the hyperfocal distance. You might want to give them a go, if you haven’t already. Although I couldn’t recommend any specific solution of this nature, because I’ve never used any of them in my practice.

Instead, I rely on experience and good knowledge of the lenses that I use. I know my lenses’ limitations, and focus accordingly to get maximum DoF in any given situation. Although I never try to calculate the exact focusing distance, since I like to work quickly and that would be a major hindrance, an understanding of the concept of hyperfocal distance underlies my decisions.

TOP TIP

And that would be my most important piece of advice: Learn what depth of field and hyperfocal distance are, how they work, and internalise these concepts. Then, get to know your lenses, experiment with them, preferably in controlled conditions. Use different apertures, focusing distances and focal lengths (if they’re zooms), study and compare the results at 100% magnification on your monitor. You will find out what your lenses are capable of and where their limits are.

With enough practice, you’ll develop a sense of where to focus to get the most out of them. And also in what situations you’ll need to make some compromises, when “total” depth of field is unattainable.

Birling Gap Sussex. Landscape & Travel Photographer Slawek Staszczuk.

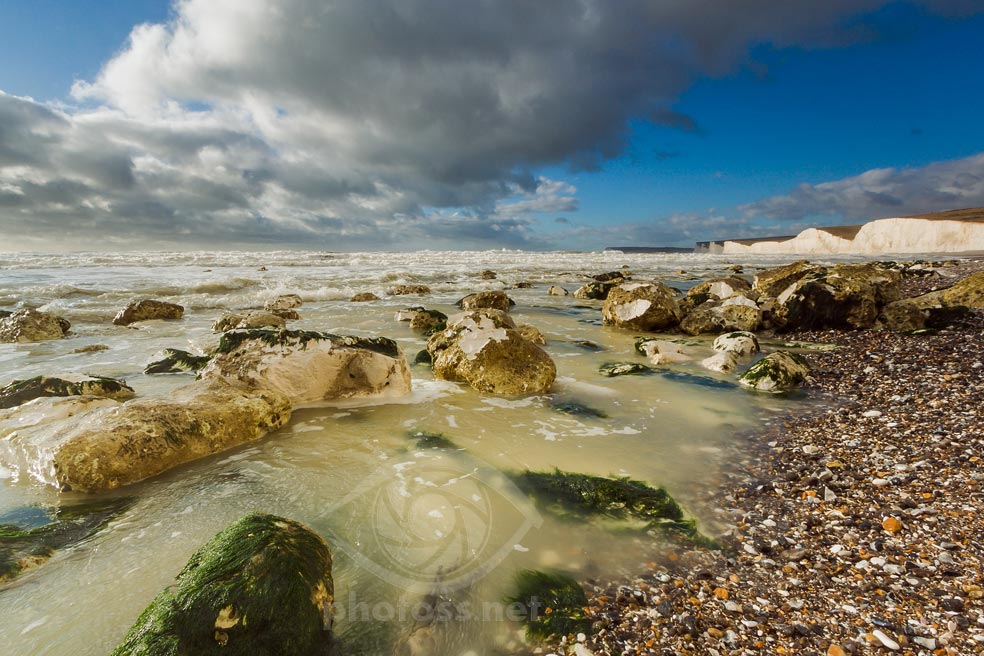
Winter afternoon at Birling Gap.

  • Focal lenth 10mm (on ASP-C sensor)
  • Aperture f/11
  • Shutter speed 1/30s
  • tripod

I focused relatively close to the camera, at about 1/4 of the frame height. Super-wide angle lenses have very short hyperfocal distances, and it’s usually quite easy to achieve acceptable sharpness across the frame. Unless there are some objects very close to the camera, which was the case here, as my tripod was maybe 50cm above the beach.

In addition, there are some features that many cameras offer, as well as a few good practices that can help you focus more precisely. Which in turn will let you achieve better depth of field.

DOF PREVIEW & FOCUS PEAKING

One useful feature, which most DSLR cameras have, that can help you in these endeavours is the depth of field preview. Your camera keeps the aperture fully open until you press the shutter release button. This is to allow a maximum amount of light to reach the focusing screen. This way you can better see what’s going on in the frame when composing your images. The DoF preview button allows you to temporarily stop down the aperture to the actual f-number that you chose for your exposure, so that you can check how it will increase the depth.

Some cameras offer a preview of what areas appear to be in good focus, by highlighting parts of the image on electronic viewfinder or LiveView. The feature, known as focus peaking, is based on edge detection. And it, too, can be helpful when you’re unsure whether you’re focusing at the optimal distance.

Porto by Night. Freelance Photographer Slawek Staszczuk

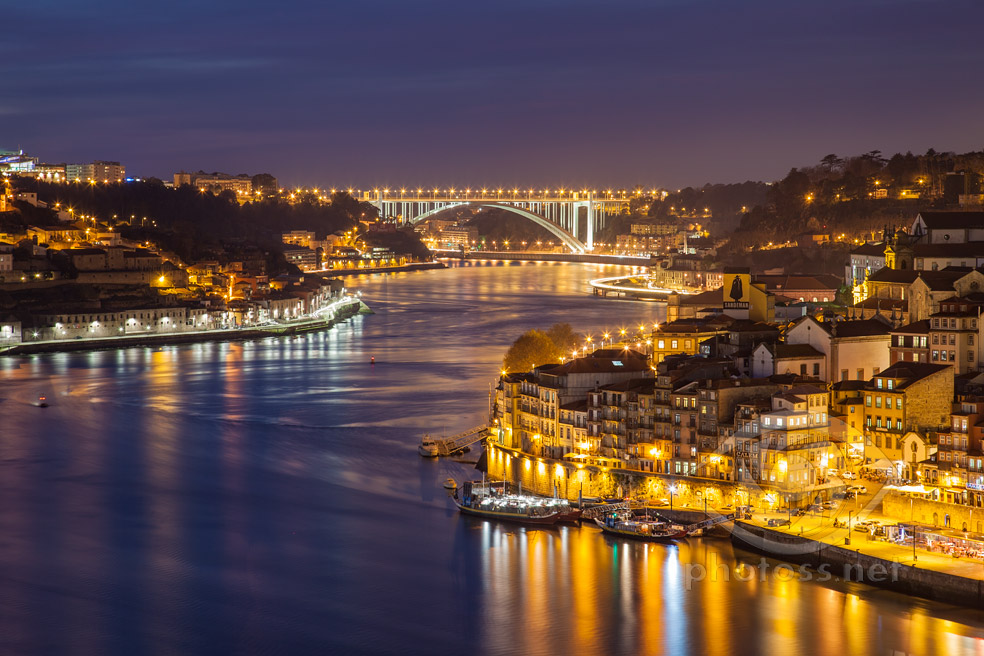
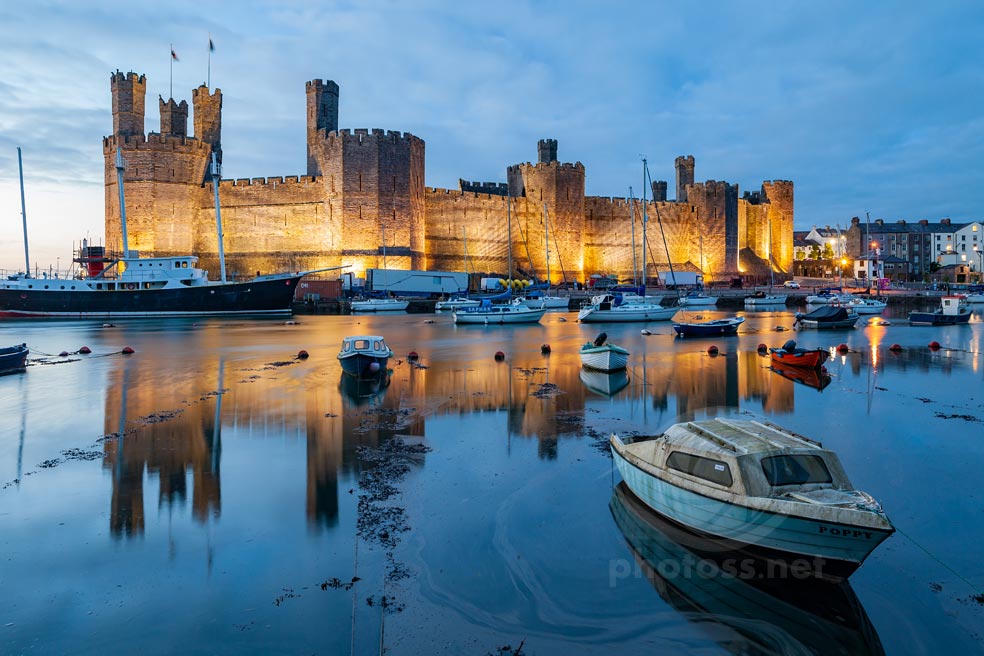
Night falls on river Douro in Porto.

  • Focal lenth 92mm
  • Aperture f/9
  • Shutter speed 30s
  • tripod

Because of the distance, a few hundred metres to the nearest objects in the frame, creating enough DoF for the whole frame, despite the longer focal length. I focused on the cluster of houses protruding into the river, about a third of the the frame height from the bottom.

BACK BUTTON & MANUAL FOCUSING

Sometimes, you’ll have some latitude as to where you need to focus to achieve good DoF. Especially with wide angle lenses you can often simply focus in the middle of the frame and get good results, if there aren’t any objects very close to the camera.

But in other situations, more precise focusing is often crucial, and you certainly don’t want to let the camera make arbitrary decisions, or focus at a random distance. With such situations in mind, I recommend back button focusing, which separates the AF function from the shutter release button.

Here’s the workflow for back button focusing: Configure the camera to use only one AF point; aim the camera at a spot where you want to set your focus, lock the AF with the back button. Then let go of the button and reframe the camera to the actual scene you want to take. Now, when you press the shutter release button, the camera won’t try to focus on a random point.

Not all cameras can be set up for back button focusing. If yours can’t, you can work around it by switching to MF after you’ve focused at the right distance using AF. Or you can simply focus manually. If you have time and the opportunity isn’t going away soon, this is most reliable approach. At least if you do the focusing on LiveView and zoom in on the area or object that you want to focus on while making the adjustments.

Where to focus in landscape photography. Slawek Stasczuk

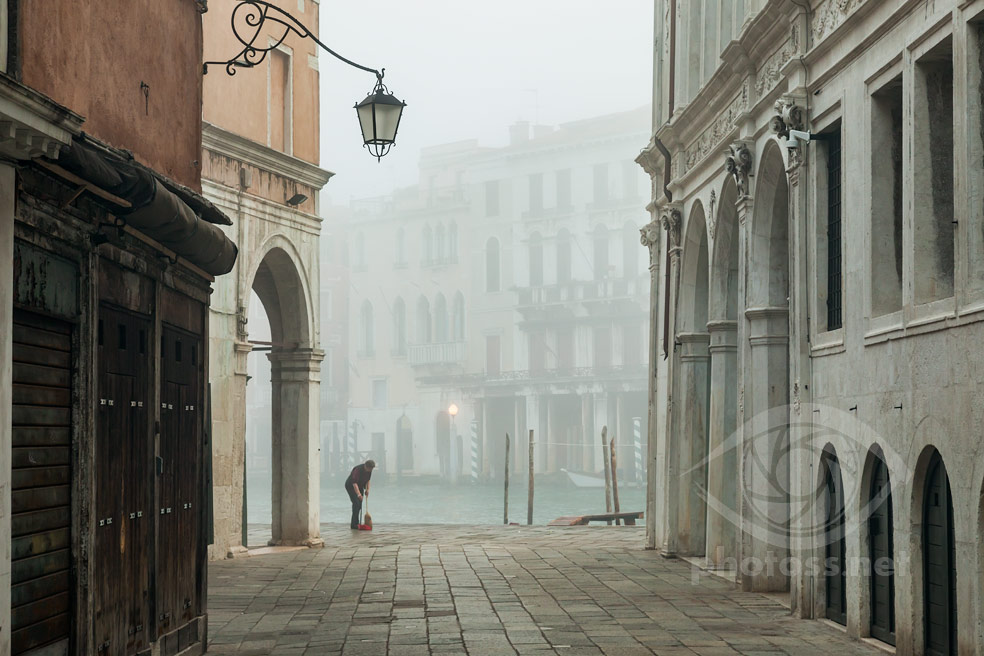
Foggy morning at San Polo, Venice.

  • Focal lenth 80mm
  • Aperture f/9
  • Shutter speed 1/20s
  • tripod

Getting everything within DoF was more challenging in this example, due to the longer focal length and short distance to the nearest elements in the frame. I probably focused just below the person (using back button focusing, and then repositioned the camera).

1/3 FROM THE BOTTOM?

You may have heard advice telling you to focus at one third of the frame’s height from the bottom. At times, this may indeed bring your focusing distance close to hyperfocal, but this “rule of thumb” certainly shouldn’t be adhered to religiously.

For example, imagine you have a lone tree in your frame and you want it to be the focal point of your image. Also, you’re using a longer focal length, say 100mm, and the tree is filling most of your frame’s height. If you focus on something behind the tree at 1/3 of the frame height, you may be running the risk of leaving it outside of the DoF. In this instance you’ll be definitely better off simply focusing on the tree. (You could focus on the foot, the middle, or the top of the tree, and the focusing distance will be essentially the same in each case.)

So it will depend on the elements in your scene, the lie of the land, how you arrange your frame, the focal length etc. And for better or worse, these is no one-size-fits-all simple hack. 1/3 from the bottom may be a good starting point, when in doubt. But that’s all it is, a starting point – for further consideration.

Neouvielle, Pyrenees, France. Slawek Staszczuk Photography.

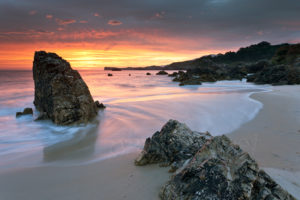
Morning on Lac d’Aumar, French Pyrenees.

  • Focal length 17mm
  • Aperture f/14
  • Shutter speed 1/4s
  • tripod

Again, due to the short focal length, creating enough DoF for the whole frame was easy. I focused on one of the foreground rocks. I used a smaller aperture to get better sharpness in the corners, rather than to increase depth.

CATCH (F) 22

Since you know that DoF increases as you stop down the aperture, you might feel tempted to keep the f-number very high to ensure you get maximum depth at all times. I would strongly advise against it, for a number of reasons. Most importantly, because of diffraction.

Depth of field will always grow as you reduce the aperture size; and up to a point, the apparent sharpness will also keep increasing, or it will get more consistent across the frame. But once you go beyond this point, which is different for every lens, instead of getting better perceived sharpness, you’ll get the opposite effect, fuzziness.

Besides, keeping the aperture very small may cost you camera shake, as it will result in much slower shutter speeds. Or it will force you to increase the ISO to some unhealthy heights, in order to avoid such problems.

Lastly, on a “cosmetic” level, very high aperture numbers will bring out even the tiniest spots on the sensor. Albeit, this doesn’t apply to cameras with fixed lenses. If you select small apertures to slow down the shutter, using an ND filter will be a much better option.

Read more about my recommended camera settings for landscape, including apertures.

Thank you for reading. Read other similar articles in my Landscape Photography is Simple “blog”. Or click on a random post below.

Leave a Comment

Your email address will not be published. Required fields are marked *