Case study: a telephoto landscape from conception to editing
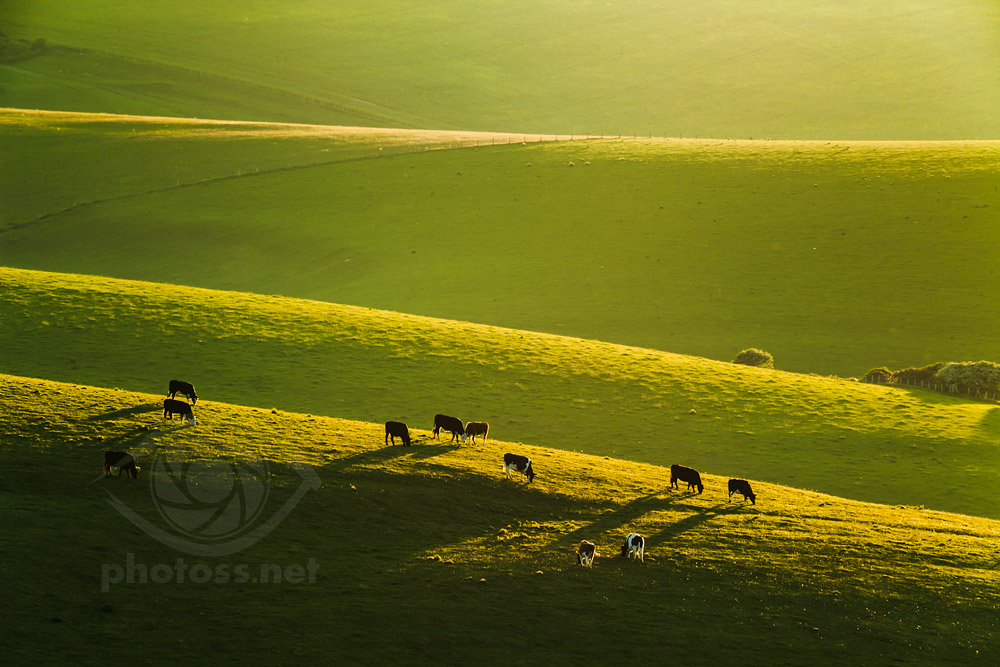
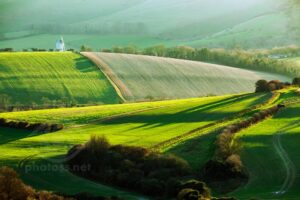
The image above is relatively old, taken one evening in early June of 2010. But I still quite vividly remember the outing, the decisions I made, and the hurdles I had to overcome. And I’d like to share with you what went into the creation of this telephoto landscape – from conception, through equipment and camera settings, to image editing.
The Vision
PLANNING
I had visited the general area on the South Downs a couple of times before, so I had a rough idea of what to expect. But since I wanted to check a vantage point I hadn’t used previously, I didn’t have any specific compositions in mind. Having studied the maps and terrain relief, I figured out where I wanted to be close to sunset. Following this plan, I ended up on a ridge, on the east side of a valley, looking towards the westering sun. In the distance I could see the hills and ridges on the opposite side of the valley. The views didn’t disappoint.
The features I wanted to focus on were a good few hundred metres away from my position, and the farthest reaches perhaps a mile away. So I had to use a very long focal length if I wanted to fill the frame with them. While I also brought wide angle and mid range lenses to this shoot, as I wanted to be prepared for any opportunity, I didn’t see much scope for them. It was a cloudless humid hazy day, and the South Downs notoriously lack photogenic foreground matter. Therefore telephoto seemed to be the best approach on this occasion.
As it turned out, I only used one lens (100-300mm with TC1.4) throughout the whole session. The main image was one of the last I took that evening.
LIGHTING - CHIAROSCURO
My intention was to use the play of light and shadow on the land in order to “model” the forms in the landscape. With the sun in front of the camera and already quite low above the horizon, the lighting conditions were ideal for it. Through the play of lit and shaded surfaces, sunlight brought to life the large formations of the landscape, by giving them an impression of volume and making it apparent that those were rounded, three-dimensional features. It also sculpted the smaller shapes, details, and textures in the same way. Besides, the low angle light coming from in front caused the cows to cast long shadows, which grounded the animals on the field, and further helped to describe the form of the lowest ridge. The sunlit top of the each fold contrasts well against the shaded hillside behind it and visually separates those features.
All of these nuances caught my eye when I was already slowly walking back to the bus stop. The same scene with sunlight coming from the opposite direction, or even from the side, would look incomparably flatter. The ridges would blend into each other, and in the resulting photo there would be little indication for the viewers that they are looking at a depiction of spatial forms. I wouldn’t feel compelled to stop and shoot then. I would, however, probably take notice of the lie of the land, and try to work out what time of day and year could best serve the scene.
COMPOSITION - LINES IN BALANCE
I don’t like straight, parallel and perpendicular lines in natural and agricultural landscapes. To my eye, they tend to make the composition static and boring, and they don’t look “organic”. I much prefer working with flowing curves, interacting at different angles. And it’s something the South Downs offer in spades (look at some examples in my South Downs gallery).
In this case, the lines I had to work with were almost perfectly straight. Thankfully they were slanting at slightly different angles, which created at least some dynamics. I tried to arrange these lines in the composition in the most balanced way I could find.

Another frame taken earlier in the session from a slightly different spot, at 332mm focal length.
Here I was pointing the camera almost straight towards the sun. But since the sun disc was a little higher in the sky, it was easier to stop the lens flare. You can also see that the surroundings were quite busy.
NO SKY
I carefully avoided the sky in the frame, as I usually do with telephoto landscapes in this vein. Because the camera was pointed so close to the sun, a small sliver of sky (which I could have possibly included) would be rendered practically white in the exposure, devoid of any detail. To me, it would feel incongruous with the rest of the scene, not like an integral part of the image. Even worse, the area where the sky met the land would have the highest contrast in the frame, and as such it would steal the viewer’s attention. Perhaps, if there was an interesting silhouette set against the whiteness of the sky, like an old windmill, this approach could be warranted. But there was nothing there, only the nearly flat horizon line, no visual pay-off. The sky would have derailed the composition.
So I zoomed in, as far as I could, to achieve better visual isolation of the scene. I could have used a shorter focal length and still kept the sky out of the frame with ease. But I felt there was too much visual competition around. And with most of the scene now in the shadow, I wasn’t getting the balance I wanted. Zooming out would have also relegated the cows to black dots. I wanted them to play a more important role in the picture.
Technical details & obstacles
FOCUSING
I set the focus on the lowest ridge, where the animals were grazing, using back button focusing and one AF point. Then I reframed the camera to the actual scene I wanted to take. At 420mm, the lens had very little depth of field, but the distance more than made up for it. I chose a smaller aperture in an attempt to squeeze a little more image quality from the lens, rather than to increase DoF. More about the teleconverter “woes” below.
Read about my general approach to focusing in landscape photography.
HAZE AND BUGS
Because my subject matter was so far away, the telephoto lens compressed a lot of haze between the camera and the scene. This created a veil obscuring the landscape. It was further compounded by swarms of small hovering insects, some of which I cloned out in editing.
The build-up of particulate matter floating in the air is one of the challenges typical of telephoto landscape. Ordinarily, as you point the camera closer to the sun, this build-up becomes more apparent and irksome. In extreme situations, it makes the scenery barely recognisable, and it always greatly diminishes contrast and saturation in the image. Yet the viewer’s eye expects to see the photographed scene with a similar degree of clarity as it does when looking at the immediate surroundings. Consequently, some degree of contrast enhancement in editing is usually necessary. Here I had to increase the contrast quite heavily. See the exact settings I used in the last section of this post.
COWS
The cattle in the distance were a welcome sight; they livened up the scene and gave the landscape a sense of scale. But many more cows grazing on the same ridge on which I was standing, just a few metres away from me. And these cows were not so helpful or cooperative. For most of the session they walked slowly left and right, constantly barging into my field of view and blocking the scene. I had to wait patiently for moments when the views were unobstructed.

One of the cows parading in front of the camera. I’m not quite happy with the proportions in this image, but it shows the broader context of the landscape.
LENS FLARE
I was pointing the camera close to the sun (indeed, in some frames the sun was straight ahead of me). As I certainly didn’t want any lens flare in the frame, I did my best to block the sun rays from hitting the front lens element directly. I used my tripod bag to do it, the lens hood didn’t help much in these conditions. Because the sun was just outside of the frame, it was often difficult to cast enough shadow to prevent the lens flare without getting a dark silhouette in the image. The wind made it a little more difficult still…
Normally, I use my hand to cast a shadow while I’m standing in front of the camera – this way I can be much more precise, since I can see what I’m doing. But I was already pressing against a fence, I couldn’t step in front of the camera. And taking a few steps back would have severely limited my framing options.
Equipment and settings
- Camera: Canon 5DII
- Lens: Sigma 100-300mm + TC1.4 @420mm
- Tripod (probably Velbon, I don’t clearly remember what I was using back then)
- Remote cable release
- Shooting mode: Av (no compensation)
- Aperture: f/11
- Shutter speed: 1/80s
- ISO: 250
- Metering: Evaluative
- Focusing: AF on Single shot
- Auto-Focus points: 1 in the centre
- Back button focusing
- Mirror lock-up
- Image quality: RAW
- White Balance: Daylight
NOT SO GOOD VIBRATIONS
There was a healthy breeze, not unwelcome on a warm June afternoon. But it was another variable I had to factor in when adjusting the settings. My telephoto lens is quite heavy, physically long, and prone to vibrations. To improve the chances of getting crisp, unshaken exposures, I increased the ISO.
Moreover, I also used mirror lock-up during the entire session, as I always do when shooting landscapes with a telephoto lens from a tripod. In DSLR cameras, when you press the shutter button, the mirror inside the body goes up – thus allowing the light to reach the sensor – and a fraction of a second later the shutter opens for exposure. The mirror claps, sending vibrations through the camera body and on to the lens. This in turn can lead to fuzzy images if the lens is long and wobbly, and the shutter speed is relatively slow. (1/80s at 420mm is slow.)
With the lock-up setting, the first press of the button lifts the mirror, and only the second one opens the shutter. This allows the photographer to wait for a second or so, until the vibrations have died down. Of course, enabling this option only makes sense if you’re using a remote release. Otherwise, by simply pressing the button on the camera body, you’ll probably introduce more vibrations during exposure than the clapping mirror would.
TELECONVERTER
The “bare” lens didn’t give me enough magnification for the scenes I wanted to capture. And since I virtually never crop my images in editing (except when I have to straighten a wonky photo), I settled for a teleconverter to extend the reach.
The converter, however, also made it more difficult to achieve acceptable image quality. It reduced the maximum available aperture from f/4 to f/5.6; caused heavier vignetting and chromatic aberrations; deteriorated the sharpness. To counteract some of these side effects, I stopped the lens down to f/11 (my go-to setting for telephoto landscape is f/8). This gave me somewhat better sharpness across the frame, and reduced the vignette a tad.
But it inevitably resulted in slower shutter speeds as well. An important consequence, given both the constant breeze, and the fact that the lens was now even longer and more susceptible to vibrations. So I had to further increase the ISO in response, for a better chance of capturing unshaken images. It was a balancing act. Looking back, I wish I had selected an even higher ISO setting, it could have given me more acceptably sharp exposures in this session…
Editing
Check the before and after comparison:

TONALITY & COLOURS


White Balance. The image was shot on Daylight. I adjusted both the Temperature and the Tint slider to taste – I moved them a few notches to the left, as the photo felt a bit too warm, warmer than I remembered.
Tonality. For reasons described above, I needed to add a lot of contrast, which I did using the Contrast, Clarity and Dehaze sliders, as well as Curves. As you can see on the screenshot, I mostly deepened the midtones and shadows with the composite Curve (I didn’t use the Curves for individual channels).
Colour. Saturation generally increases as you raise the contrast. I added so much contrast in this case that there was no need to use the vibrance or saturation sliders.
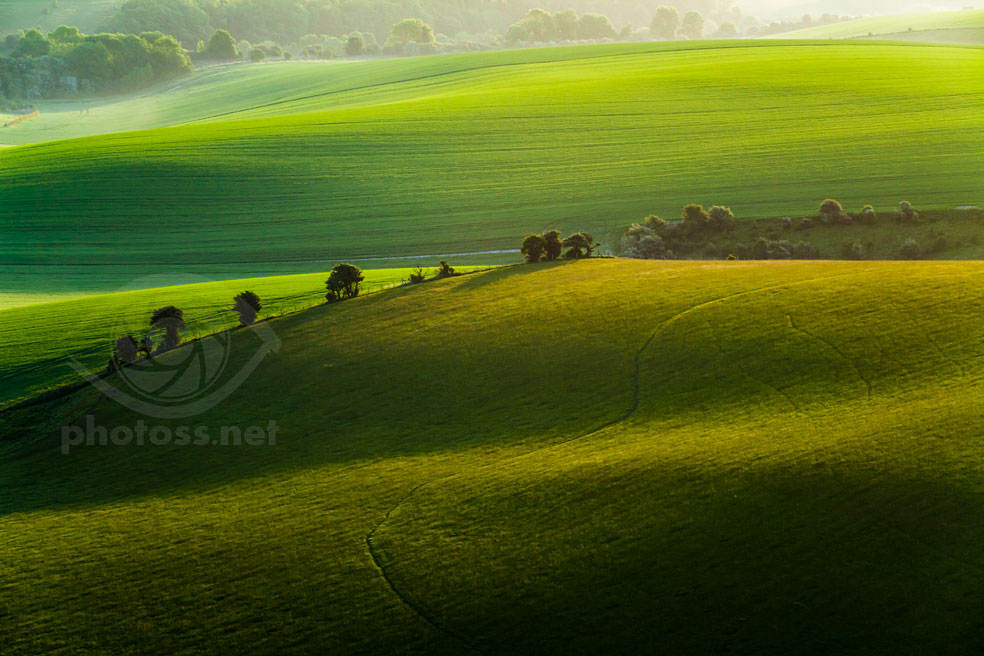
A different spot on the South Downs near Brighton on the following morning. Even though I got home quite late after the session, I decided to make an effort (and it was an effort for me, I’m not a natural early bird) and wake up about 4am on the following day. Luckily, this time the effort was rewarded with some pleasant light at one of my then favourite haunts on the Downs.
DETAILS
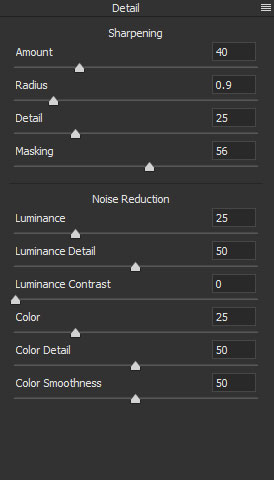
Sharpening. I essentially accepted the default settings, apart from Masking. This parameter allows you to limit the area to which sharpening is applied, and therefore it can help you avoid needlessly accentuating noise in portions of your image that don’t have any defined detail. By the way, sharpening at this level is only meant to counteract the demosaicing process (you may need to sharpen more before printing).
Noise Reduction. I was only concerned with the Luminance and Color parameters, both of which I increased slightly from their default values while checking the effects at 100% (1-1 pixel); haze or fog often seem to exacerbate the noise. Otherwise I left the sliders at default settings.
LENS CORRECTIONS
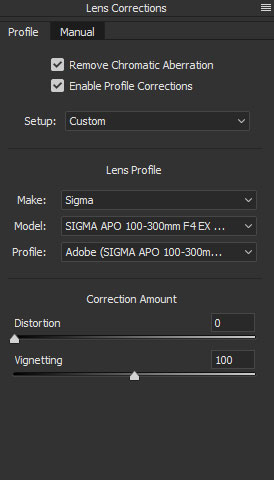
Chromatic Aberration. There was hardly any noticeable fringing, mostly around the cows’ silhouettes. The automatic removal did away with it easily.
Lens distortion. There is some pincushion distortion in the image but it’s insignificant, so I chose not to correct it.
Vignetting. A little bit of vignetting was still present, even at f/11, and I preferred to get rid of it.
These are all the settings I used, and I didn’t do any further editing in Photoshop or a similar application.
I used ACR (Adobe Camera RAW) plugin for this example, as most readers will likely be familiar with it. But any good RAW processing software today offers identical or analogous tools, and similar effects can be easily achieved in other programs.
Thank you for reading. Check out other similar articles in my Landscape Photography is Simple “blog”. Or click on a random post below.
Nothing to see here… Earlier this year I ran a